 Manual · Tour guide system
Orpheo OTG Light
Charging, pairing and guiding: everything you need to use the OTG Light transmitter and receivers quickly and with confidence.
About this manual
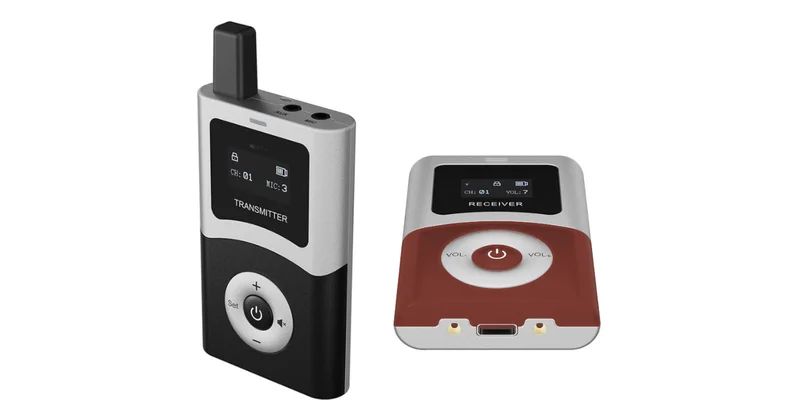
The Orpheo OTG Light is a wireless tour guide system. The guide speaks into a microphone on the transmitter, and every participant hears them through a lightweight receiver with an earpiece. Even in a busy gallery or out on the street.
This manual first introduces the transmitter and the receiver. You then follow six steps: charging, switching on the transmitter, pairing the receivers, setting the sound, the tour itself and switching off. At the end you will find the technical data, a troubleshooting table and every button together. In the PDF, that overview fits on one page, handy to keep in the charging case.
- ·How the OTG Light works
- ·Components and accessories
- ·The transmitter at a glance
- ·The receiver at a glance
- ·The steps at a glance
- 1Charging
- 2Switching on the transmitter and choosing a channel
- 3Pairing the receivers
- 4Setting the microphone and volume
- 5During the tour
- 6Switching off and storing
- ·Technical data
- ?Troubleshooting
- ✓Every button on one page
A button is shown in brackets and highlighted like this: [+], [SET] or [VOL+]. The power button is [power] and the button with the crossed-out speaker is [mute]. What appears on the display is shown in capitals: CHS, BT or All Off. A short press is a quick press; a long press means holding the button down until something changes.
How the OTG Light works
The transmitter sends the guide's voice digitally to every receiver on the same channel. There is no limit to the number of listeners.
Several groups at once
The European version has 19 channels. Each guide picks a channel of their own, so up to 19 groups can tour side by side without hearing each other. The same works for multilingual groups: one channel per language, for example with an interpreter speaking along.
Where to use it
Wherever guided tours take place, indoors and outdoors: museums and galleries, monuments, churches, factories, zoos, gardens, city walks and conferences. Because the sound is transmitted digitally, the guide stays easy to understand even in noisy surroundings.
Range up to 200 metres in open field · 19 channels (EU) · 38-gram receiver · receiver up to 40 hours, transmitter up to 10 hours on one charge · Bluetooth and AUX input on the transmitter · pair or switch off all receivers with one button · charging case for 32 devices.
Components and accessories
Check that everything is there before you set off with a group.
Devices and charging
- Transmitter for the guide, black, 71 grams
- Receivers for the participants, red, 38 grams
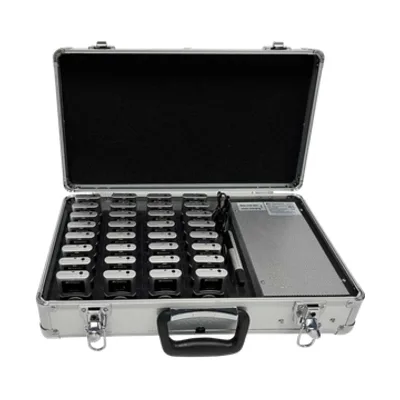
- Charging case with handle and 32 charging slots, for 100–240 V
- USB-C cable to charge a single device
Accessories
| Accessory | For | Standard |
|---|---|---|
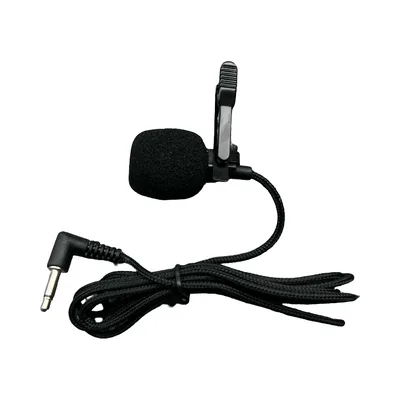
| Tie-clip microphone | Guide (transmitter) | included |
| Semi-rigid mono earpiece | Participant (receiver) | included |
| Black lanyard | Guide and participants | included |
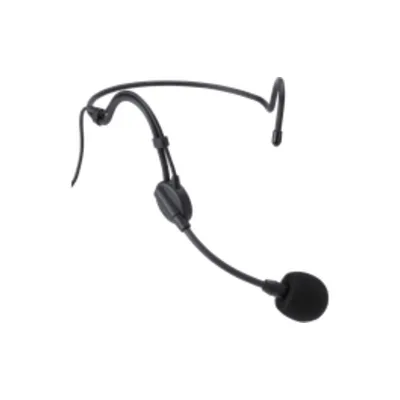
| Headset microphone | Guide (transmitter) | on request |
| Orpheo Airset headphones | Participant (receiver) | on request |
| Stereo headphones | Participant (receiver) | on request |
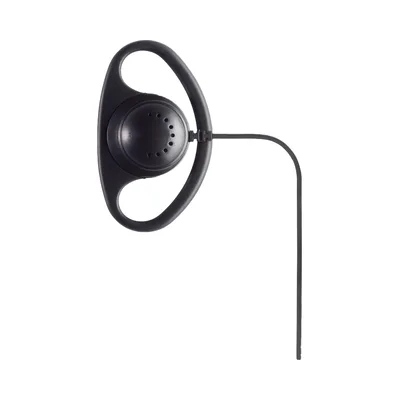
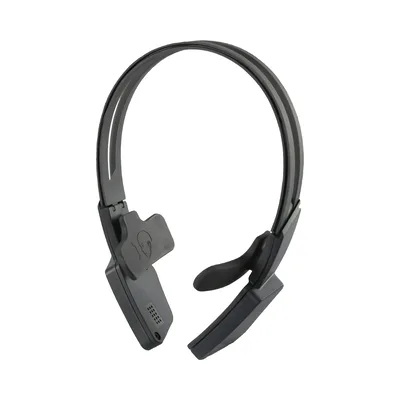
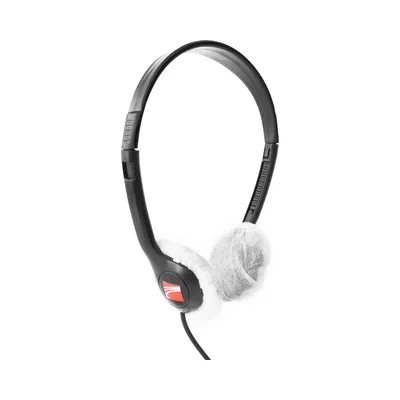
The receiver has a standard 3.5 mm socket. Participants can therefore also use their own wired earphones. That is hygienic and saves luggage.
The transmitter at a glance
The transmitter is for the guide. You can recognise it by the antenna and the black lower half.
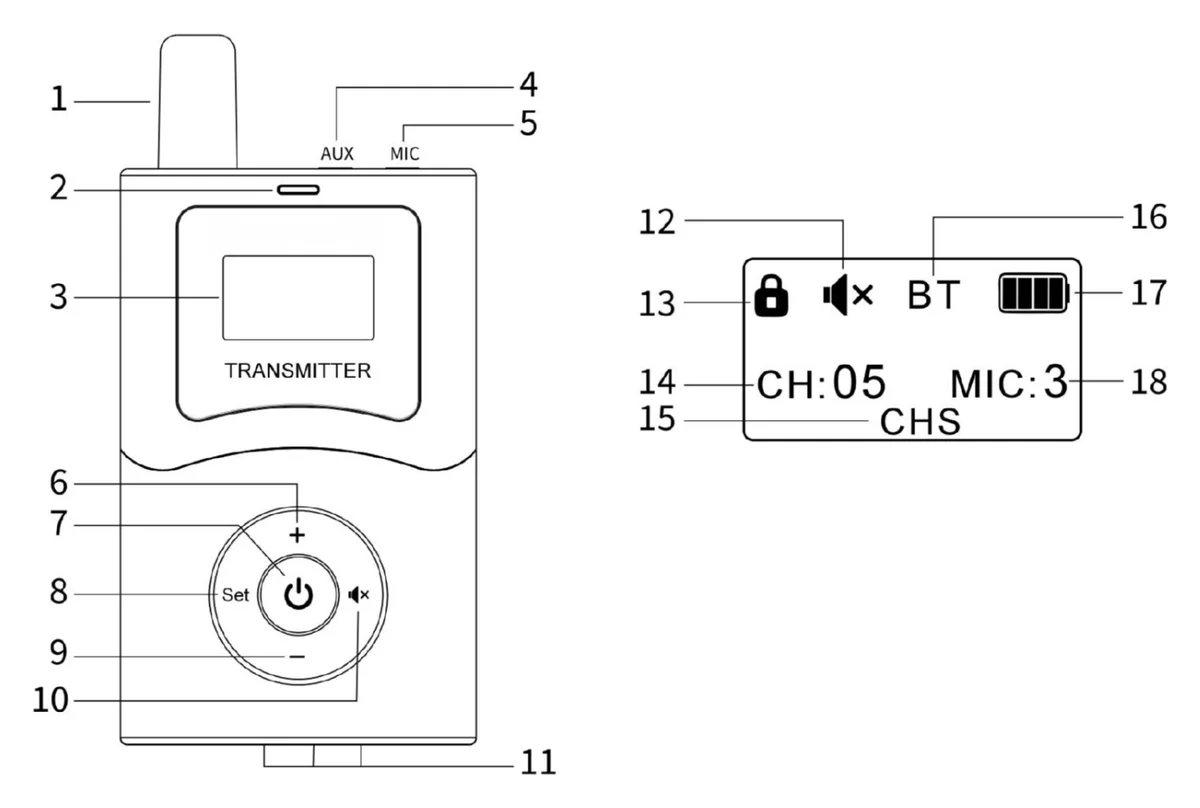
| No. | Part |
|---|---|
| 1 | Antenna |
| 2 | Indicator light |
| 3 | Display |
| 4 | AUX input, 3.5 mm |
| 5 | Microphone input, 3.5 mm |
| 6 | [+] short: channel up · long: unlock |
| 7 | [power] |
| 8 | [SET] Bluetooth on or off |
| 9 | [–] short: channel down · long: all receivers off |
| No. | Part |
|---|---|
| 10 | [mute] locked: pause the sound · unlocked: microphone gain |
| 11 | USB-C charging port and charging contacts |
| 12 | Mute symbol: the microphone is muted |
| 13 | Padlock: the buttons are locked |
| 14 | CH: the current channel |
| 15 | CHS: pairing is active |
| 16 | BT: Bluetooth is on |
| 17 | Battery level |
| 18 | MIC: microphone gain (1–4) |
The transmitter is normally locked (padlock on the display). That way the channel does not change if the guide presses a button by accident. To change the channel or the microphone gain, unlock it first. After about 10 seconds without use, it locks itself again.
The receiver at a glance
The receiver is for the participants. It weighs just 38 grams and has three buttons.
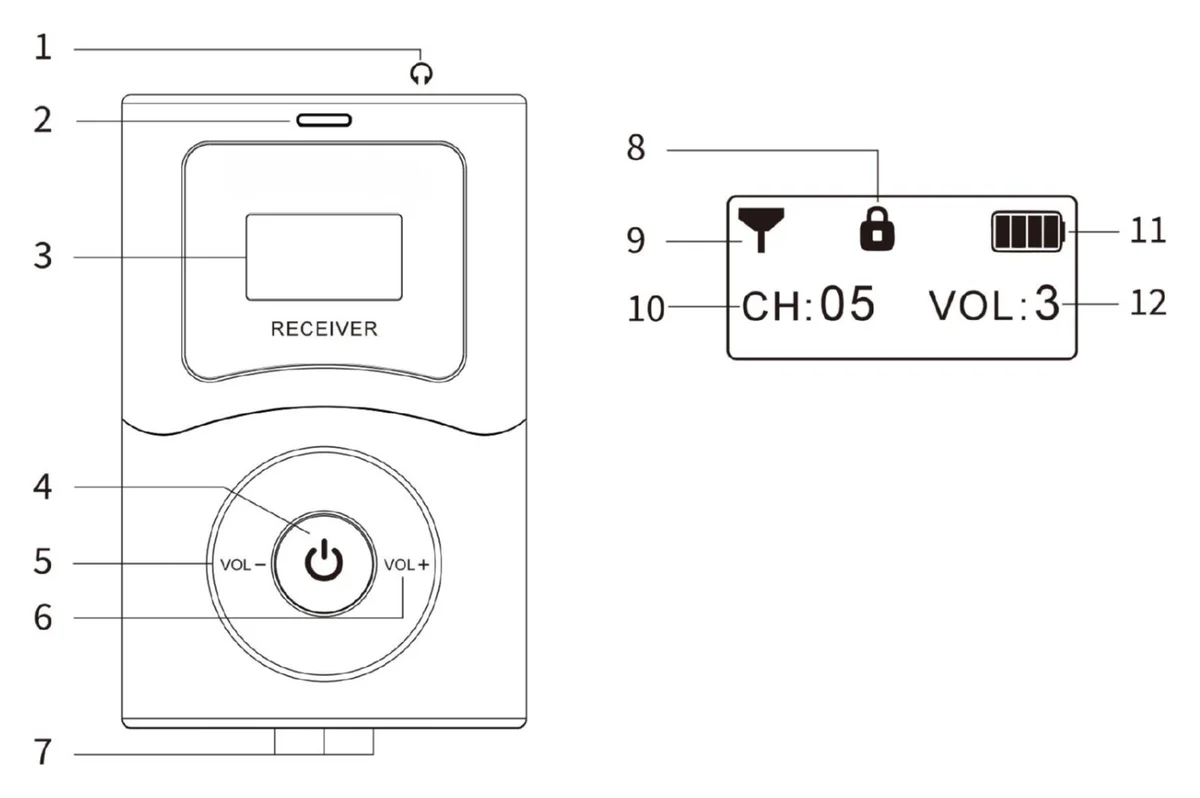
| No. | Part |
|---|---|
| 1 | Socket for earpiece or headphones, 3.5 mm |
| 2 | Indicator light |
| 3 | Display |
| 4 | [power] |
| 5 | [VOL–] locked: quieter · unlocked: channel down |
| 6 | [VOL+] locked: louder · unlocked: channel up |
| No. | Part |
|---|---|
| 7 | USB-C charging port and charging contacts |
| 8 | Padlock: the buttons are locked |
| 9 | Signal from the transmitter |
| 10 | CH: the current channel |
| 11 | Battery level |
| 12 | VOL: the volume (0–9) |
A participant only needs to set the volume. The guide sets the channel for everyone in one go before the tour, see step 3. A receiver that picks up no signal for 20 minutes switches itself off.
The steps at a glance
Six steps, in this order. Each step has its own chapter further on with all the details.
Charging
All devices in the charging case or on the USB-C cable. The first time for at least 15 minutes.
BeforehandTransmitter on
Plug in the microphone, switch on the transmitter and choose a free channel.
TransmitterPair receivers
Receivers on, within 6 metres of the transmitter. One press and they follow the channel.
Transmitter and receiversSet the sound
Microphone gain on the transmitter, volume on the receivers. A quick test.
Transmitter and receiversGuide the tour
Speak, pause with mute, or play music and commentary via Bluetooth or AUX.
On the waySwitch off
All receivers off with one button, collect the devices and charge them again.
AfterwardsCharging
With full batteries, a receiver lasts about 40 hours and the transmitter about 10 hours. Plenty for several tours a day.
Charge new devices for at least 15 minutes before using them.
In the charging case
- Switch the devices off.
- Place them in the slots of the case. The charging contacts on the bottom connect automatically.
- Plug the case into the mains (100–240 V). The indicator on the case shows the charging status.
With the USB-C cable
- Plug the USB-C connector into the charging port of the device.
- Plug the other end into a computer or a USB adapter. A 5 to 10 watt adapter charges fastest.
| Light | Meaning |
|---|---|
| Red on | The battery is charging. |
| Red off, green on | The battery is full: after about 5 hours (transmitter) or 3 hours (receiver). |
| Red and green flashing | Charging is not possible: the temperature is outside 0–45 °C. |
Good to know
- Preferably charge at 10 to 40 °C. Never charge below 0 °C.
- Use the charger or charging case supplied.
- When the battery is almost empty, the battery icon shows empty. Charge the device as soon as possible.
- Bluetooth on the transmitter does not work when the battery is low.
- Transmitter running flat during a tour? It also works while charging on the cable, for example from a power bank.
Switching on the transmitter and choosing a channel
Each group has its own channel. If several groups set off at the same time, give each guide a different channel.
- Plug the microphone into the MIC input (number 5) on top of the transmitter.
- Hold [power] for 2 seconds. The display lights up and shows the channel, for example CH: 05.
- Unlock the transmitter: hold [+] for 3 seconds until the padlock disappears.
- Choose the channel with [+] or [–]. CHS appears on the display: the transmitter now also takes nearby receivers along to this channel (step 3).
- After about 10 seconds without use, CHS disappears and the transmitter locks again.
Choosing a channel and pairing the receivers happen with the same press of the button. So switch on your group's receivers first and keep them close to the transmitter when you choose the channel. Step 3 is then done in one go.
Pairing the receivers
With the pairing function, you set all of your group's receivers to the transmitter's channel in one go. Nobody needs to set anything themselves.
3a · All receivers at once (recommended)
- Switch the receivers on: hold [power] on each receiver for 2 seconds. Keep them together, for example on a table.
- Keep the transmitter within 6 metres of the receivers.
- Unlock the transmitter (hold [+] for 3 seconds) and briefly press [+] or [–]. The display shows CHS.
- All receivers within 6 metres switch to the transmitter's channel automatically. Check on a few receivers that CH shows the same number as the transmitter.
- After about 10 seconds, pairing stops, CHS disappears and the transmitter locks.
Pairing works on every receiver that is switched on within 6 metres of the transmitter. If two groups' receivers are lying side by side, they will all go to the same channel. So pair group by group, and keep the other group's receivers switched off or more than 6 metres away.
3b · Setting one receiver by hand
Does a participant join once the group is already on its way? Then set that one receiver to the right channel by hand.
- Make sure the receiver is off.
- Hold [VOL+], then also hold [power]. The receiver switches on without the padlock.
- Choose the transmitter's channel with [VOL+] or [VOL–].
- After about 5 seconds without use, the receiver locks. The buttons then control the volume again.
3c · Automatic search
If you do not know the channel, let the receiver search for a transmitter itself.
- Make sure the receiver is off and the transmitter is on.
- Hold [VOL–], then also hold [power]. The light flashes blue: the receiver is searching.
- After about 12 seconds, the search stops. Green light: there is a signal. Blue light: no transmitter was found.
Setting the microphone and volume
Set the sound before the group sets off. Do a quick test and let a participant listen in.
4a · The microphone on the transmitter
- Attach the microphone about 15 centimetres from the mouth, for example on the collar.
- Unlock the transmitter (hold [+] for 3 seconds).
- Press [mute] to choose the microphone gain. You see the level after MIC, from 1 (low) to 4 (high).
- If the voice sounds too quiet, choose a higher level. If it sounds distorted or you hear breathing, choose a lower one.
4b · The volume on the receiver
- Plug the earpiece or headphones into the socket on top of the receiver.
- Press [VOL+] for louder or [VOL–] for quieter. There are 10 levels (0–9); the level is shown after VOL.
Speak in your normal voice. Precisely because everyone hears you in their ear, you do not need to raise your voice over traffic or chatter. That saves your voice on a long day.
During the tour
The transmitter can pass on more than just the guide's voice.
5a · Pausing the sound (mute)
- Hold [mute] for 2 seconds. The mute symbol appears: the participants no longer hear you.
- Hold [mute] for 2 seconds again to carry on.
Handy when you briefly need to talk to a colleague or a gallery attendant.
5b · Playing sound from a phone via Bluetooth
Let the group hear a piece of music, an interview or recorded commentary from your phone.
- Make sure the transmitter is locked (padlock visible).
- Hold [SET] for 3 seconds. BT appears on the display and the light flashes blue quickly.
- Turn on Bluetooth on your phone, search for OTG Light and connect.
- Once connected, the light flashes blue slowly. Whatever the phone plays, the participants hear in their earpiece.
- Hold [SET] for 3 seconds again to turn Bluetooth off. The light then shows green again.
The transmitter remembers your phone. The next time you switch it on, it reconnects automatically.
5c · Sound via a cable (AUX)
Does your sound source have no Bluetooth? Then connect it with a 3.5 mm cable to the AUX input (number 4) of the transmitter.
The transmitter runs for about 10 hours on one charge. Planning a full day with several tours? Bring a power bank with a USB-C cable: the transmitter keeps working while it charges.
Switching off and storing
After the tour, you switch off every receiver at once with one press of a button.
6a · All receivers off at once
- Gather the group so that the receivers are within 6 metres of the transmitter.
- Make sure the transmitter is locked (padlock visible).
- Hold [–] for about 5 seconds. The display shows All Off: all paired receivers switch off.
- Press any button to leave this mode.
6b · Switching off a single device
Hold [power] for 2 seconds. This works on both the transmitter and the receiver.
6c · Storing and transporting
- Put the devices back in the charging case and charge them for the next tour.
- If the set will not be used for a few days, for example during transport, switch all devices off completely. That saves the batteries.
- Clean earpieces and headphones after use, or let participants keep their earpiece.
6d · Resetting a device
Is a transmitter or receiver not doing what it should? Reset it by hand:
- Switch the device off completely.
- Wait 10 seconds.
- Switch the device back on.
Technical data
The key data for the European version.
| Transmitter | |
|---|---|
| Dimensions | 107 × 54 × 16 mm |
| Weight | approx. 71 g |
| Display | OLED, 22.5 × 12.5 mm |
| Inputs | microphone and AUX (3.5 mm), Bluetooth |
| Battery | Li-ion, 2000 mAh, 3.7 V |
| Operating time | approx. 10 hours |
| Charging time | approx. 5 hours |
| Range | up to 200 m (open field) |
| Receiver | |
|---|---|
| Dimensions | 73 × 46 × 14 mm |
| Weight | approx. 38 g |
| Display | OLED, 17.7 × 9.7 mm |
| Output | 3.5 mm stereo socket |
| Volume | 10 levels |
| Battery | Li-ion, 600 mAh, 3.7 V |
| Operating time | approx. 40 hours |
| Charging time | approx. 3 hours |
| Radio and audio | |
|---|---|
| Technology | UHF, all-digital, low power |
| Frequency Europe | 823–832 MHz and 863–865 MHz · 19 channels |
| Frequency US | 902–928 MHz · 50 channels |
| Channel spacing | 500 kHz · frequency stability 20 ppm |
| Receiver sensitivity | −92 dBm |
| Frequency response | 20 Hz – 4 kHz (tuned for speech) |
| Signal-to-noise ratio | −87 dB |
| Operating temperature | −10 to +50 °C |
| Charging case | 32 charging slots · 100–240 V, 50/60 Hz |
Which radio frequencies you may use differs from country to country. The European version uses the European frequencies; there is a separate version for the United States. If you are taking the set to a country outside Europe, ask us beforehand which version suits it.
Troubleshooting
Something not working as expected? Find what you see below.
| What you see | What to check |
|---|---|
| A participant hears nothing | Does the receiver show the same channel (CH) as the transmitter? Is the volume above 0? Is the earpiece plugged in properly? Does the transmitter show the mute symbol? Otherwise pair the receiver again (step 3). |
| The receivers do not follow the channel | Are they switched on and within 6 metres of the transmitter? Does CHS appear on the transmitter? Pairing stops after 10 seconds; unlock the transmitter and try again. |
| Another group can be heard | Two transmitters are on the same channel. Choose a different channel for your group and pair your receivers again. |
| Another group's receivers were paired too | They were switched on within 6 metres of your transmitter. Pair groups one at a time (step 3a). |
| The voice sounds quiet | Raise the microphone gain (step 4a) and check that the microphone is properly plugged into MIC. |
| The voice sounds distorted or breathy | Lower the microphone gain and keep the microphone about 15 cm from the mouth. |
| The buttons do something unexpected | Check whether the padlock is on the display. Some buttons have a different function when locked or unlocked. |
| Bluetooth will not connect | Is BT on the display? Is the transmitter battery not almost empty? Search for OTG Light on the phone. |
| All Off does not switch off every receiver | Was the transmitter locked? Were all receivers within 6 metres? Switch off any stragglers by hand. |
| A receiver switches itself off | It has received no signal for 20 minutes. Or the battery is empty: charge it. |
| Red and green flash while charging | It is too hot or too cold to charge. Charge at 10 to 40 °C. |
| A device no longer responds | Reset it: switch off completely, wait 10 seconds, switch on again (step 6d). |
Every button on one page
Locked = padlock on the display. Remote pairing and switching off work within 6 metres.
| Transmitter | |
|---|---|
| On / off | [power] 2 s |
| Unlock | [+] 3 s · locks itself after ±10 s |
| Choose channel + pair | unlocked: [+] or [–] · CHS |
| Microphone gain | unlocked: [mute] · MIC 1–4 |
| Mute on / off | [mute] 2 s |
| Bluetooth on / off | locked: [SET] 3 s · search for OTG Light |
| All receivers off | locked: [–] 5 s · All Off |
| Receiver | |
|---|---|
| On / off | [power] 2 s |
| Volume | [VOL+] / [VOL–] · 0–9 |
| Channel by hand | off: hold [VOL+] + [power], then [VOL+] / [VOL–] |
| Automatic search | off: hold [VOL–] + [power] · green = signal |
| Lights | |
|---|---|
| Red | charging |
| Green (charging) | battery full |
| Red and green flashing | too hot or too cold to charge |
| Blue, fast (transmitter) | Bluetooth looking for a connection |
| Blue, slow (transmitter) | Bluetooth connected |
| Blue flashing (receiver) | searching for a transmitter |
| Battery | |
|---|---|
| Transmitter | ±10 hours · charging ±5 hours |
| Receiver | ±40 hours · charging ±3 hours |
| Charging | at 10–40 °C · first time 15 min beforehand |
| Reset | off · wait 10 s · on |
Need help?
Get in touch with us. Tell us what you see on the display of the transmitter and the receiver, and what you have already checked in the table above. Then we can help you quickly.
- GuideXpresse
- Edisonstraat 3E
2723 RS Zoetermeer
The Netherlands - Phone
- +31 79 20 33 007
- Contact form
- Manual as PDF
- 16 pages, A4, to print or keep in the charging case. Download as PDF
 References