 Manual · Video synchronisation
Connecting BrightSign to an Orpheo Driver
Step by step to a working installation in which your audio guides run exactly in time with the video. For BrightSign HD2, HD3, HD4 and XT.
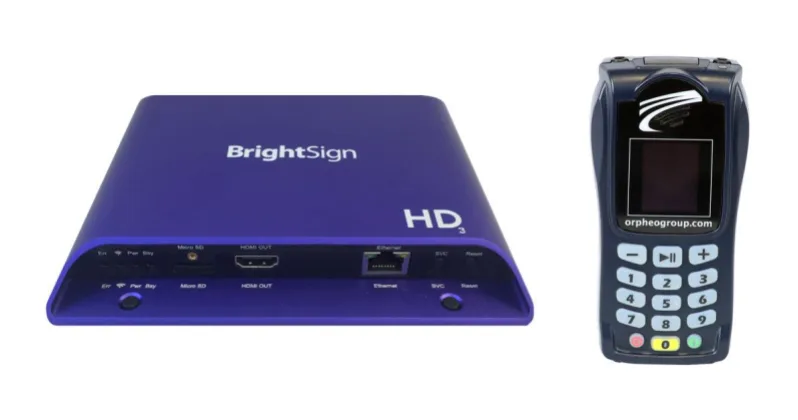
About this manual
With this manual you connect a BrightSign media player to an Orpheo Driver yourself. Afterwards, visitors hear in their audio guide exactly the sound that belongs to the picture on the screen: in their own language, at the right moment.
You go through six steps. First you prepare the video and the audio files. Then you set up the audio guides in GuideXpresse Manager, program the BrightSign, configure the Driver and lay the cabling. Finally you test the installation and fine-tune the synchronisation. At the bottom you will find an overview of all settings together. In the PDF it fits on one page, handy to keep next to you during the installation.
- ·How video synchronisation works
- ·What do you need?
- ·The plan at a glance
- 1Preparing the video and the sound
- 2Setting up the audio guides in GuideXpresse Manager
- 3Programming the BrightSign with BrightAuthor
- 4Setting up the Driver with Driver Manager
- 5Connecting everything
- 6Testing and fine-tuning
- ?Troubleshooting
- ✓All settings on one page
Buttons, tabs and fields are marked like this: Edit settings. A path through the menus is written as File › Presentation Properties. In the screenshots of GuideXpresse Manager, whatever you need to click or fill in is outlined in orange.
How video synchronisation works
The video plays without sound. The sound is in the visitor's audio guide, in the chosen language. The Orpheo Driver makes sure both run exactly in time.
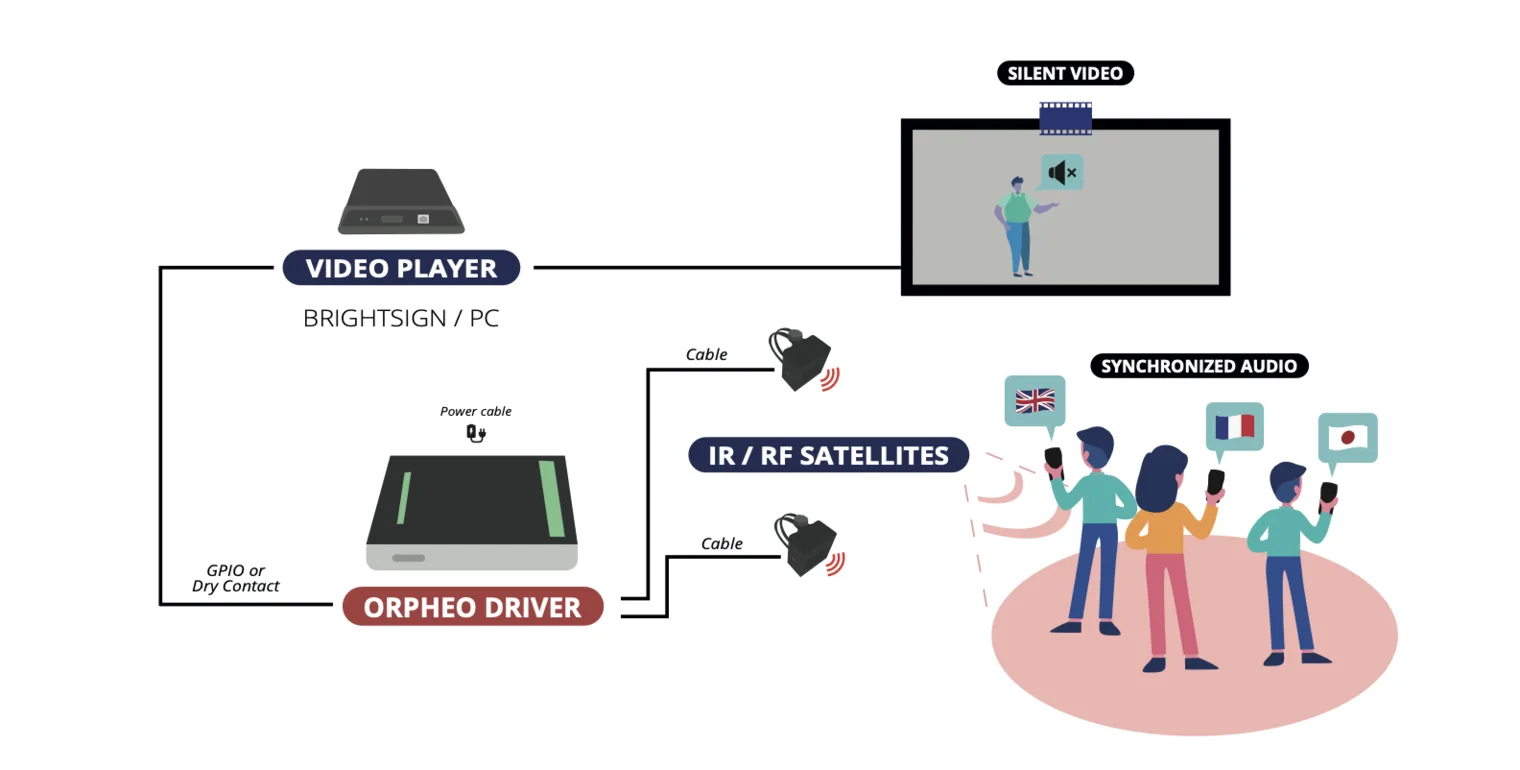
What does the visitor experience?
In this manual we use manual synchronisation, the most common form. The visitor walks into the video room, keys in the number of the video on the audio guide and immediately hears the sound that belongs to the picture at that moment. Even if the film is already halfway.
When the video starts again, the audio guide automatically starts along with it. That way the visitor can stay to see the beginning after all. This is called cycle sync, and we switch it on in step 2.
Why a short first showing?
The very first time the BrightSign plays the video, it loads it into its memory. That causes a small delay between the first frame and the signal to the Driver, so this first round never runs exactly in sync. That is why we program the BrightSign to stop the first showing after 10 seconds. All rounds after that run steadily.
What do you need?
Have everything ready before you start. Then you can go through the steps without interruption.
Equipment
- BrightSign media player HD2, HD3, HD4 or XT, with power supply
- Screen or projector with HDMI cable
- Orpheo Driver (V4 or V5) with power adapter
- One or more IR satellites with connection cable (up to four per Driver)
- Two connecting wires between the BrightSign and the Driver, preferably black and red
- SD or microSD card for the BrightSign
- A Windows computer with a serial port or a USB-to-serial adapter
- RS232 cable (serial cable) to connect the Driver to the computer
- Orpheo Mikro LX audio guides and the cable to connect an audio guide to the computer
- A small flat screwdriver for the screw terminals
Software and access
- BrightAuthor to program the BrightSign (free download from brightsign.biz)
- Driver Manager 2.1 to set up the Driver (installer Driver Manager 2.1.0.0 setup.exe)
- An account for GuideXpresse Manager with your museum's audio folder
Files
- The video as MP4 (H.264), in the resolution of the screen
- The audio files for the video, one per language
- Optional: a black image (black.png) in the resolution of the screen
The video gets its own number, the POI number. That is the number the visitor keys in. You use it in two places: in GuideXpresse Manager and in the Driver (as Track Code). In this manual we use POI 5 · Video room – film as an example.
The plan at a glance
Six steps, in this order. Each step has its own chapter further on with all the details.
Prepare video and sound
Video at screen resolution, sound taken out of the video, everything in one folder.
Your computerSet up the audio guides
Infrared on, video sync at 25 fps, the sound of POI 5 on manual synchronisation.
GuideXpresse ManagerProgram the BrightSign
Interactive playlist with a short first showing and a GPIO signal at every start.
BrightAuthorSet up the Driver
Synchro mode, Track Code 5, type BrightSign, start On High State.
Driver ManagerConnect everything
Two wires from BrightSign to Driver, satellites on SAT1 and SAT2, HDMI and power.
On siteTest and fine-tune
Watch, listen and adjust the offset until picture and sound coincide exactly.
On site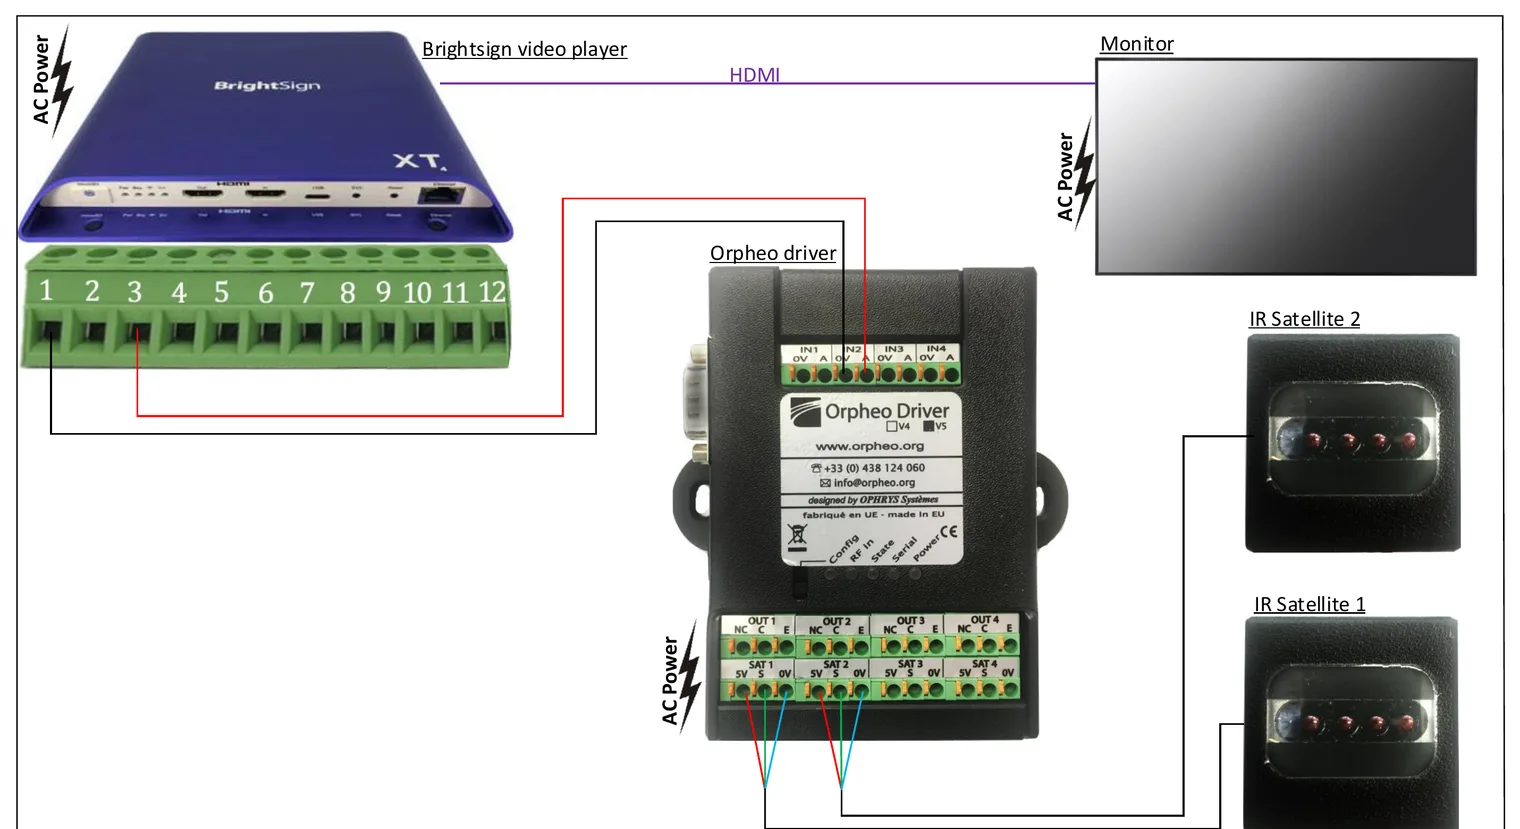
Preparing the video and the sound
Good files are the basis of good synchronisation. Take your time for this.
The video
- Preferably export the video in the resolution of the screen, for example 1920 × 1080.
- Use MP4 with H.264. Exactly which formats your BrightSign supports is listed in the specifications of your model.
- Preferably export at 25 frames per second. That matches the setting of the Driver and the audio guides (PAL, 25 fps).
The sound
- Take the sound out of the video, or have it recorded per language on the edit of the video.
- Make sure every audio file starts at the same moment as the video and is just as long. A silence at the start of the video therefore also belongs at the start of the audio file.
- Supply the sound as MP3, WAV, M4A, AAC, OGG, FLAC or WMA. GuideXpresse Manager converts it to the audio guide's format (OGG, stereo, 44.1 kHz) when you upload it.
The black image (optional)
Between two showings the BrightSign very briefly shows an intermediate step. If you want a black screen there, make a completely black image in the resolution of the screen and name it black.png. Without this file you use an Event Handler in step 3; that works just as well.
Put the video and the black image in the same folder on your computer. BrightAuthor will also save the project (the .bpf file) in that folder. If the files are somewhere else, the BrightSign will not find them.
| File | Format | Goes to |
|---|---|---|
| Video | MP4 (H.264), screen resolution, preferably 25 fps | Project folder on your computer › BrightSign |
| black.png | PNG, completely black, screen resolution | The same project folder |
| Sound per language | As long as the video, starts at the same moment | GuideXpresse Manager, at POI 5 of every language |
Setting up the audio guides in GuideXpresse Manager
In GuideXpresse Manager you tell the audio guides two things: that they must listen for infrared, and that the sound of POI 5 runs along with the video. You do that in two places: in the general settings of the audio folder and in the audio file itself.
2a · Uploading the sound
- Log in to GuideXpresse Manager and open your museum's audio folder.
- For each language, upload the audio file of the film at POI 5, just as you do for other POIs.
- Give the POI a recognisable title, for example Video room – film.
2b · Switching on infrared and video sync for the whole audio folder
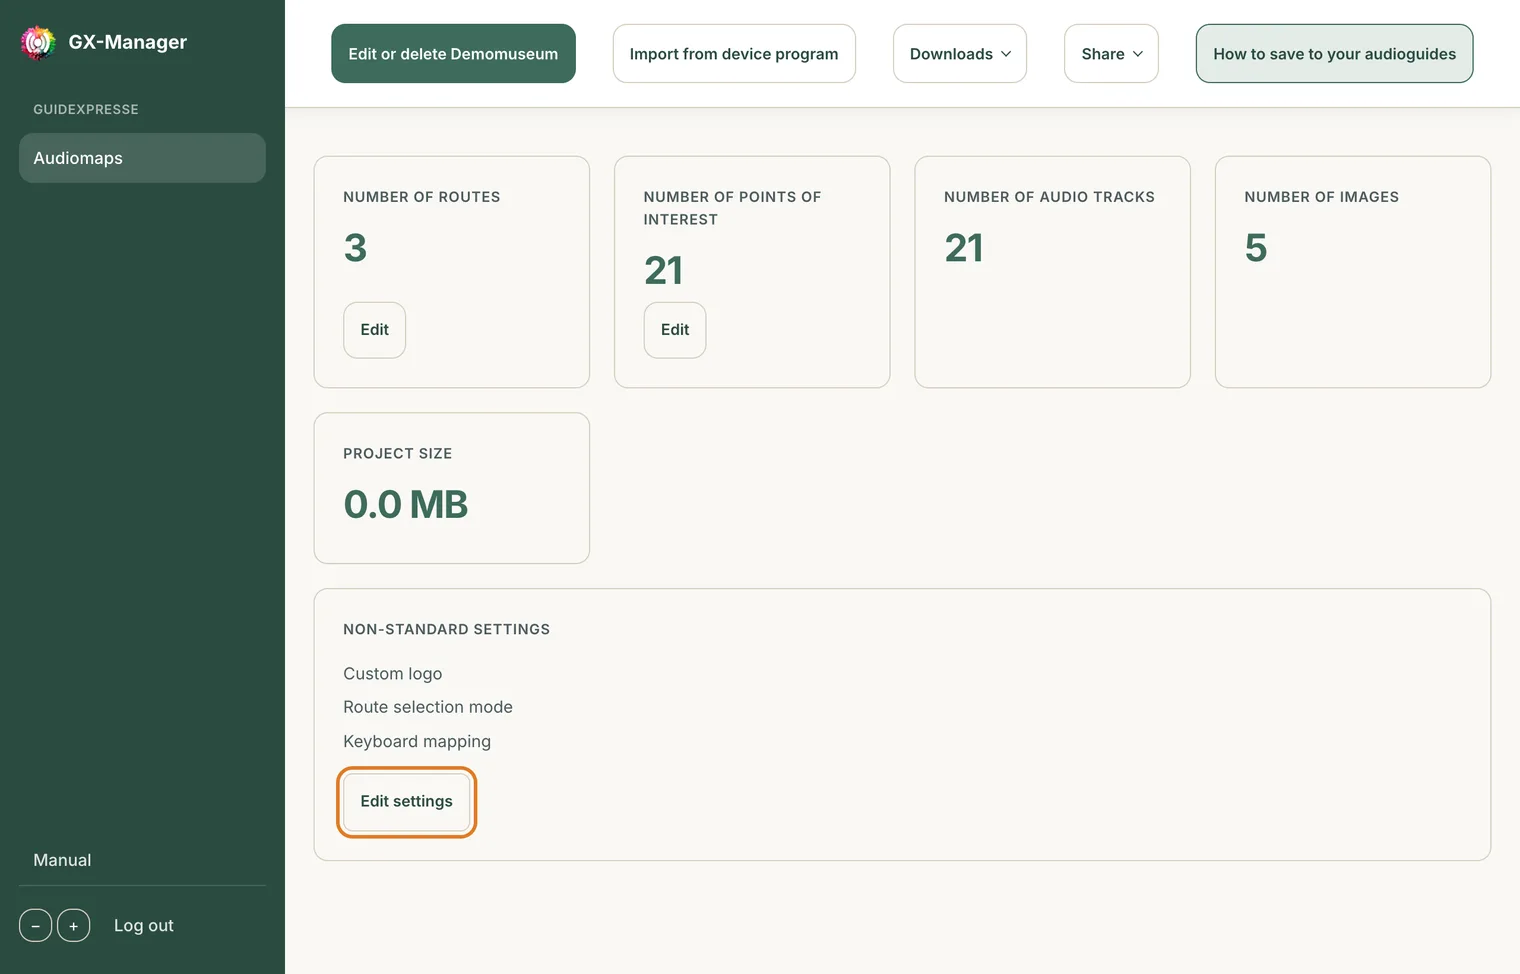
- On the project page of your audio folder, in the Non-standard settings block, click Edit settings.
- Open the Remote sensing tab.

- Switch on Infrared Enabled. Only then do the other fields appear.
- Under Infrared Protocol, choose the protocol of your Driver: Driver V5 (newer than 2018) or Driver V4 (2018 and older). Which one you have is shown on the Driver's label (a tick at V4 or V5). This must match what you set in the Driver in step 4.
- Under Video sync › Frame rate, choose PAL (25 frames/second).
- Enter −6 as the starting value for Offset (number of frames). You fine-tune this value in step 6.
- Leave Group on None, unless several infrared systems work side by side in the same room.
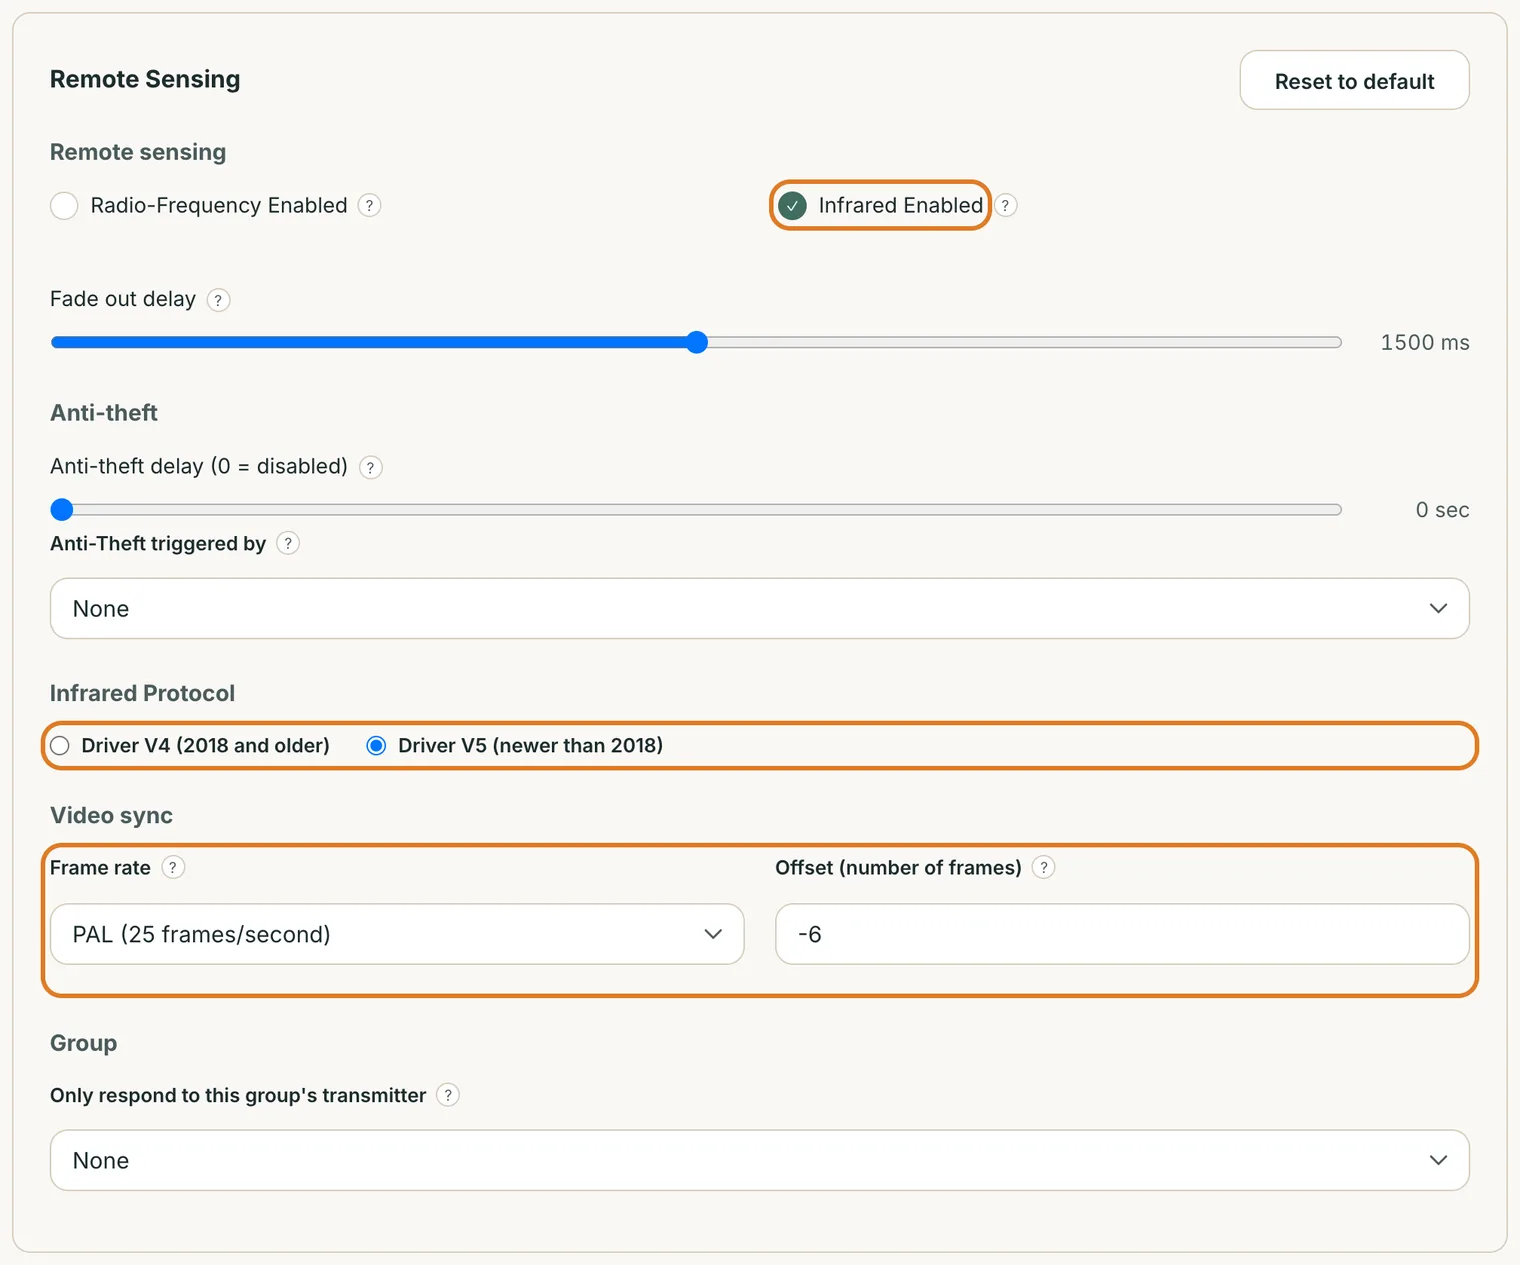
This page has no separate save button: every change is stored immediately.
2c · Linking the sound of the film to the video
Now you set the audio file of POI 5 to run along with the video. You do this for every language.
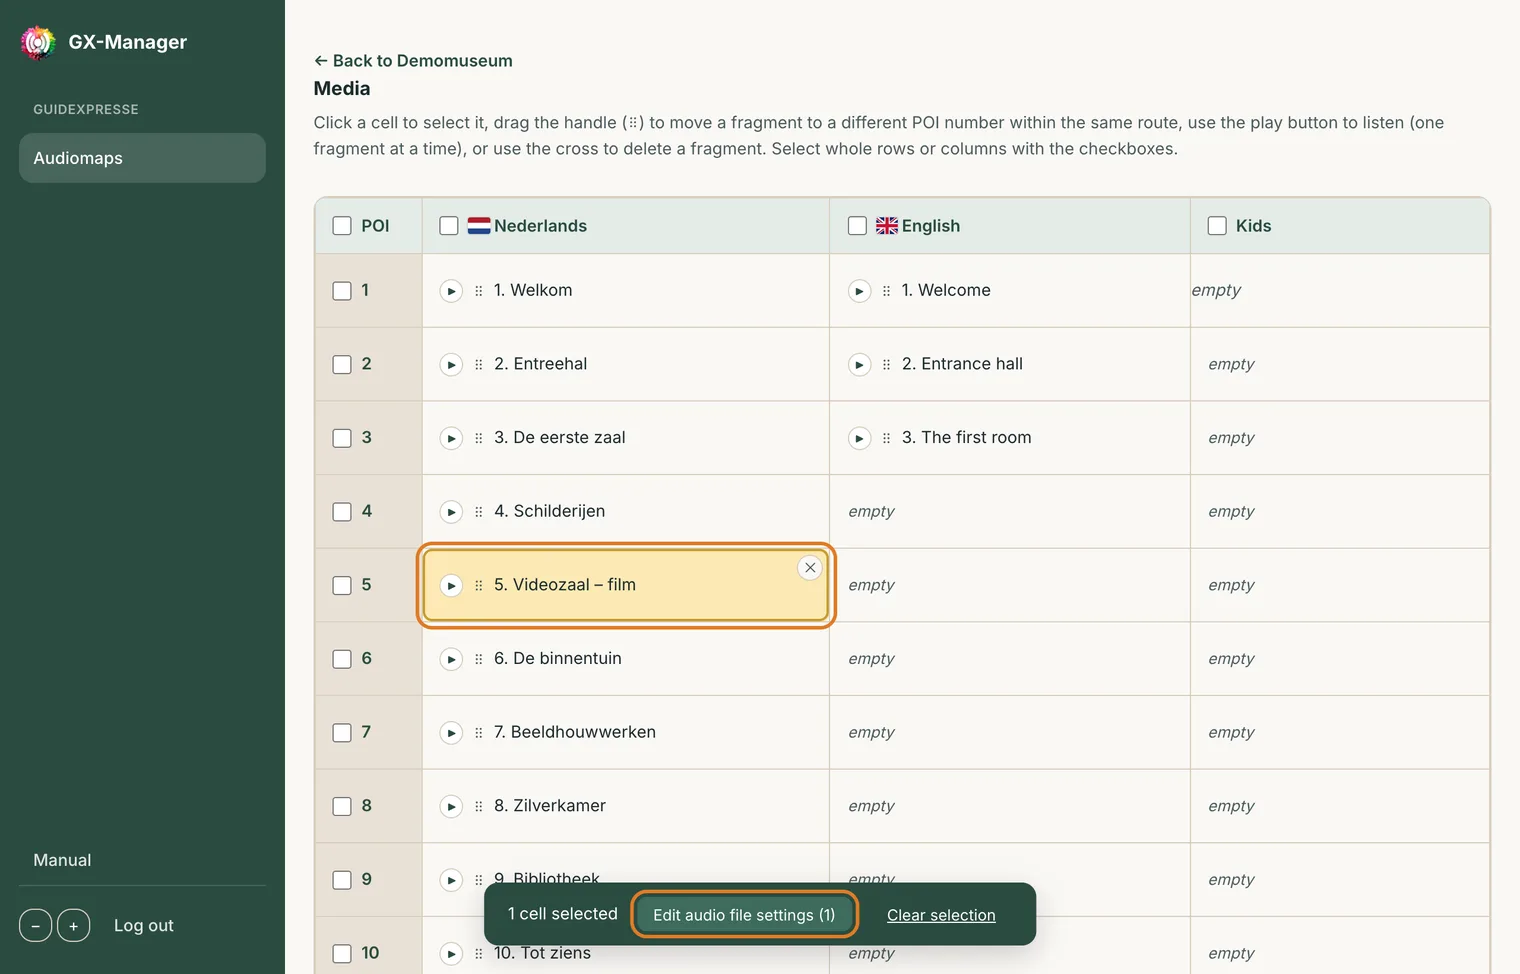
- Go back to the project page and open the media grid (Media).
- Click the cell of POI 5. To set all languages at once, tick the box in front of the number 5: the whole row is then selected.
- At the bottom, click Edit audio file settings.
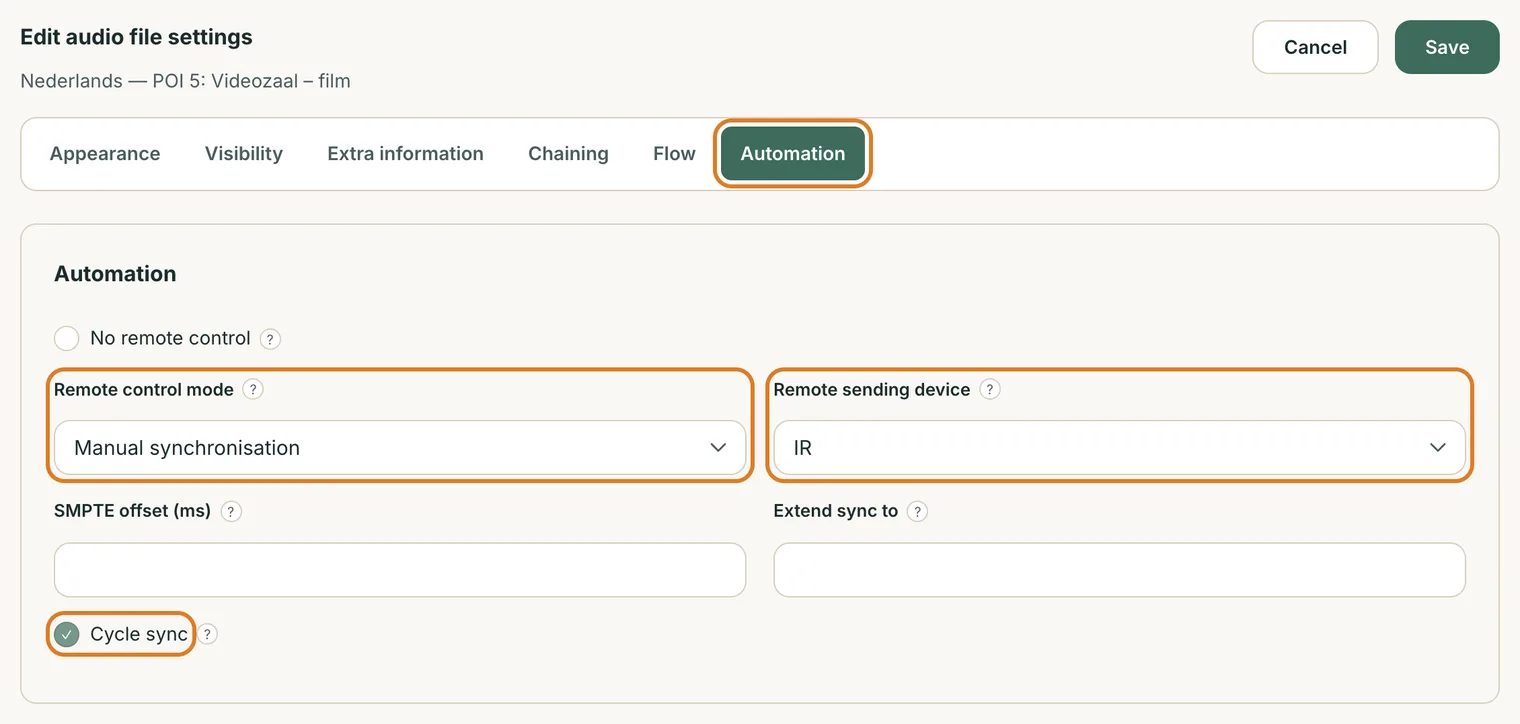
- Open the Automation tab.
- Make sure No remote control is off.
- Under Remote control mode, choose Manual synchronisation.
- Under Remote sending device, choose IR.
- Switch on Cycle sync. The audio guide then starts again as soon as the video starts again.
- Leave SMPTE offset (ms) and Extend sync to empty for now.
- Click Save.
| Field | What it does |
|---|---|
| Manual synchronisation | The visitor keys in the number and hears the sound from wherever the video is at that moment. Recommended, especially when several videos are close to each other. |
| Auto synchronisation | The audio guide starts by itself as soon as it picks up the signal. Repeating then always happens automatically. |
| SMPTE offset (ms) | Shifts only this audio file a number of milliseconds later relative to the video. Only needed if one language runs differently from the rest. |
| Extend sync to | Only for multiple video sources: every POI number between this POI and the number entered is then accepted too. |
2d · Putting the program on the audio guides
The settings only work once they are on the audio guides. That works as you are used to:
- Put an audio guide in USB mode: key in 1478963i (together the keys form the letter U). The screen shows USB connection Available.
- Connect the audio guide to your computer with the USB cable.
- On the project page, click Downloads and choose the download of the whole project. In Chrome or Edge, Download to device writes directly to the connected audio guide.
- This audio guide is now the Master. Pass the program on to the other audio guides via the charger.
If you only adjust an offset or a setting while fine-tuning, choose the download of the settings only under Downloads. It is much faster and leaves the sound on the audio guide untouched. You will find the full explanation in GuideXpresse Manager under How to save to your audioguides.
Programming the BrightSign with BrightAuthor
You build a small interactive presentation: the video plays in a loop and gives the Driver a signal at every start. Follow the steps exactly in this order.
3a · Creating a new project
- Choose File › New presentation.
- Enter a project name under Save As.
- Under Where, choose the folder with your video and black.png (see step 1).
- Choose the BrightSign model you are using. Note: you cannot change this later.
- Choose the resolution of the screen, for example 1920x1080x25p. Then create the project.
You program in the Edit tab. On the left you see the available files (Media Library, files tab), on the right the playlist.
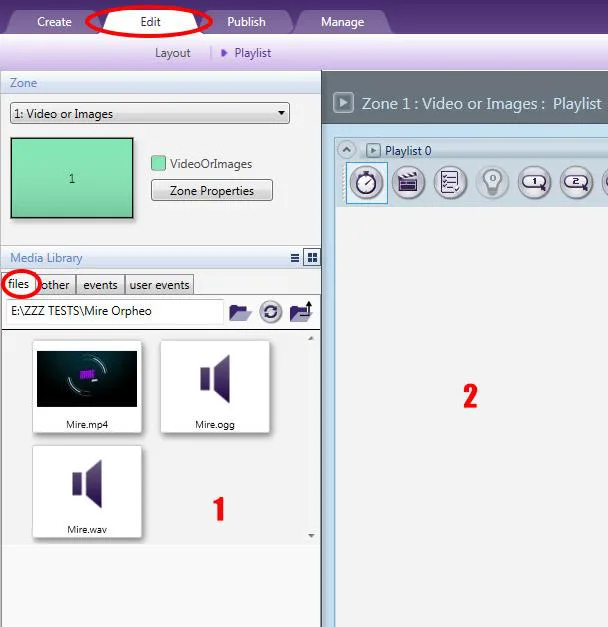
3b · Building the playlist
- At the top right, set Playlist type to interactive.
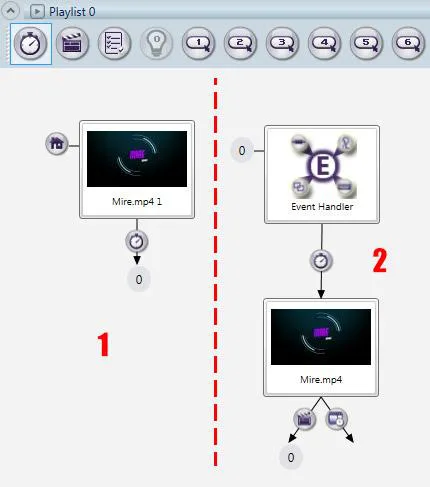
- Drag the video into the playlist. It gets a little house: this is the starting showing (Home).
- From the other tab, drag an Event Handler into the playlist (or drag black.png there).
- Drag the video into the playlist again.

Once with the house (the short first showing) and once without the house (the showing that keeps repeating). See figure 2 under "How video synchronisation works".
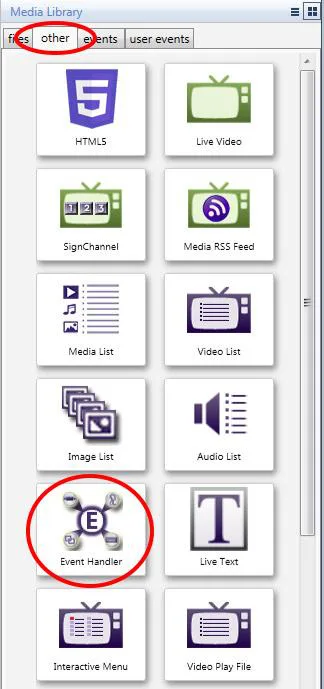
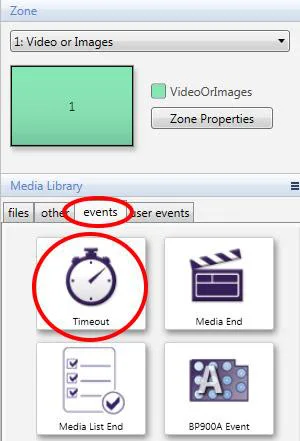
3c · Setting up the transitions
With events you decide when the BrightSign moves on to the next item. You find them on the left in the events tab.
- Drag a Timeout onto the video with the house. Set: timeout 10 seconds, Transition to new state: the Event Handler (or black.png).
- Drag a Timeout onto the Event Handler (or black.png). Set: timeout 1 second, Transition to new state: the video without the house.
- Drag a Media End onto the video without the house. Transition to new state: the Event Handler (or black.png).
| From | Event | Setting | To |
|---|---|---|---|
| Video (Home) | Timeout | 10 seconds | Event Handler / black.png |
| Event Handler / black.png | Timeout | 1 second | Video (without house) |
| Video (without house) | Media End | end of the video | Event Handler / black.png |
3d · Setting up the signal to the Driver (GPIO)
The BrightSign signals the Driver via GPIO port 0: high (3.3 V) means "the video starts now", low (0 V) means "idle".
- Choose File › Presentation Properties › I/O and set GPIO 0 to Output.
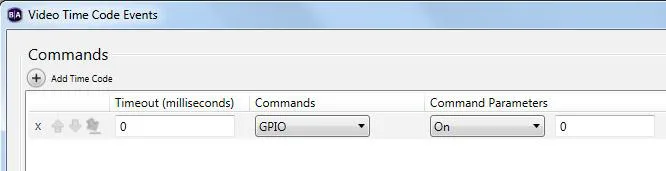
- From the events tab, drag a Video Time Code onto the video without the house. In the Commands window that opens:
- click Add Time Code
- Timeout (milliseconds): 0
- Commands: GPIO
- Command Parameters: On and in the field next to it: 0
- Right-click the video with the house › Edit (or double-click it). Choose the Advanced tab › Entry Commands › Add Command: Commands GPIO, Command Parameters Off, in the field next to it 0.
- Do the same for the Event Handler (or black.png): Advanced › Entry Commands › Add Command: GPIO, Off, 0.
- Save the project with File › Save (Ctrl+S).
At start-up the GPIO outputs of the BrightSign are high (3.3 V) by default. The Driver would see that as a start signal. By first setting the output low at the first showing and at the intermediate step, the Driver sees a clear transition from low to high at every new start of the video.
| Item | Command | Result |
|---|---|---|
| Video (Home) | Entry Command · GPIO · Off · 0 | GPIO 0 low (0 V) |
| Event Handler / black.png | Entry Command · GPIO · Off · 0 | GPIO 0 low (0 V) |
| Video (without house) | Video Time Code 0 ms · GPIO · On · 0 | GPIO 0 high (3.3 V) at the start |
3e · Putting the presentation on the SD card
- Format the SD or microSD card as FAT32.
- Go to the Publish tab › Local Storage.
- Tick Standalone unit on the left and click Publish.
- Let BrightAuthor write the content to the card. Then put the card in the BrightSign.
Switch on the BrightSign with only the screen connected. You see the video for about 10 seconds, then very briefly black (or the intermediate step) and then the video from the beginning. After that the video keeps repeating. If that is what you see, the BrightSign is ready.
Setting up the Driver with Driver Manager
In the Driver you set which POI number it transmits, via which satellites, and how it recognises the start signal from the BrightSign.
4a · Installing and connecting Driver Manager
- Double-click Driver Manager 2.1.0.0 setup.exe and follow the installation. At the end, tick Run application to start the program straight away.
- Connect the Driver with the RS232 cable to the serial port (or the USB-to-serial adapter) of the computer.
- Connect the Driver's power supply. The Driver starts immediately: the red light comes on and the green and orange lights flash.
- Put the Driver in configuration mode (see the Driver's manual; the Config light on the Driver shows this).
- Click Test Connexion. If the connection works, you see the software version at the bottom of the window.
- Click Read Driver to read in the Driver's current settings.
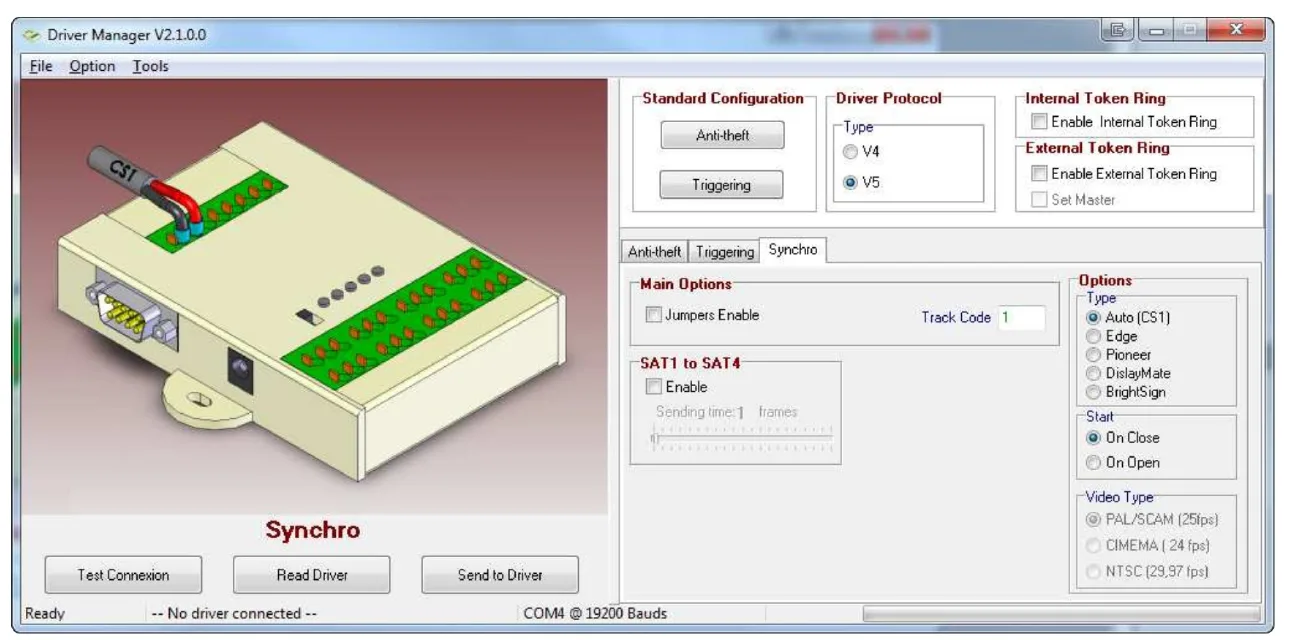
Some settings of the Driver can damage the Driver or the satellites if set to the wrong value. Leave everything not mentioned in this manual untouched.
4b · Setting up the synchronisation
- Under Driver Protocol › Type, choose V5 or V4, exactly as you chose under Infrared Protocol in step 2. V5 is the recommended standard.
- Under Internal Token Ring, tick Enable Internal Token Ring. This makes the satellites transmit in turn so they do not interfere with each other.
- Open the Synchro tab.
- Under Main Options › Track Code, enter the POI number of the video: in our example 5. Leave Jumpers Enable off.
- Under SAT1, tick Enable and set Sending time to 7 frames. Do the same for SAT2, SAT3 and SAT4 if you connect a satellite there too.
- Under Options › Type, choose BrightSign.
- Under Start, choose On High State.
- Under Video Type, check that PAL/SECAM (25fps) is selected.
- Click Send to Driver to send everything to the Driver.
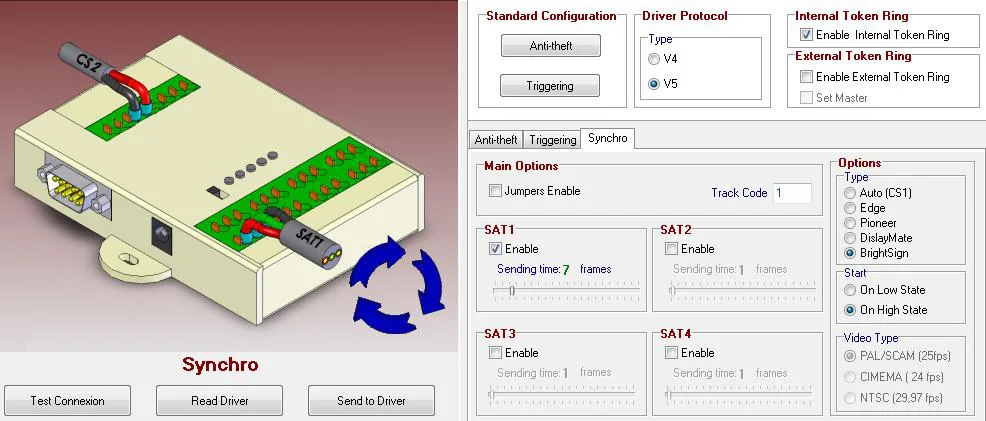
Via the File menu you can save the configuration as a file. Handy if you later want to set up a second Driver the same way, or need to replace the Driver.
Alternative to the Track Code: you can also set the POI number with the small switches on the Driver's circuit board. In that case tick Jumpers Enable. For most installations, entering it in Driver Manager is easier.
Connecting everything
Connect everything with the power off. Only when everything is secured do you switch the devices on.
5a · BrightSign to Driver: two wires
The BrightSign has a green screw terminal (GPIO, Phoenix type) with 12 connections. You use two of them.
| BrightSign (GPIO terminal) | Wire | Orpheo Driver |
|---|---|---|
| Pin 1 · GND | black | IN2 · 0V |
| Pin 3 · BUTTON 0 (GPIO 0) | red | IN2 · A |
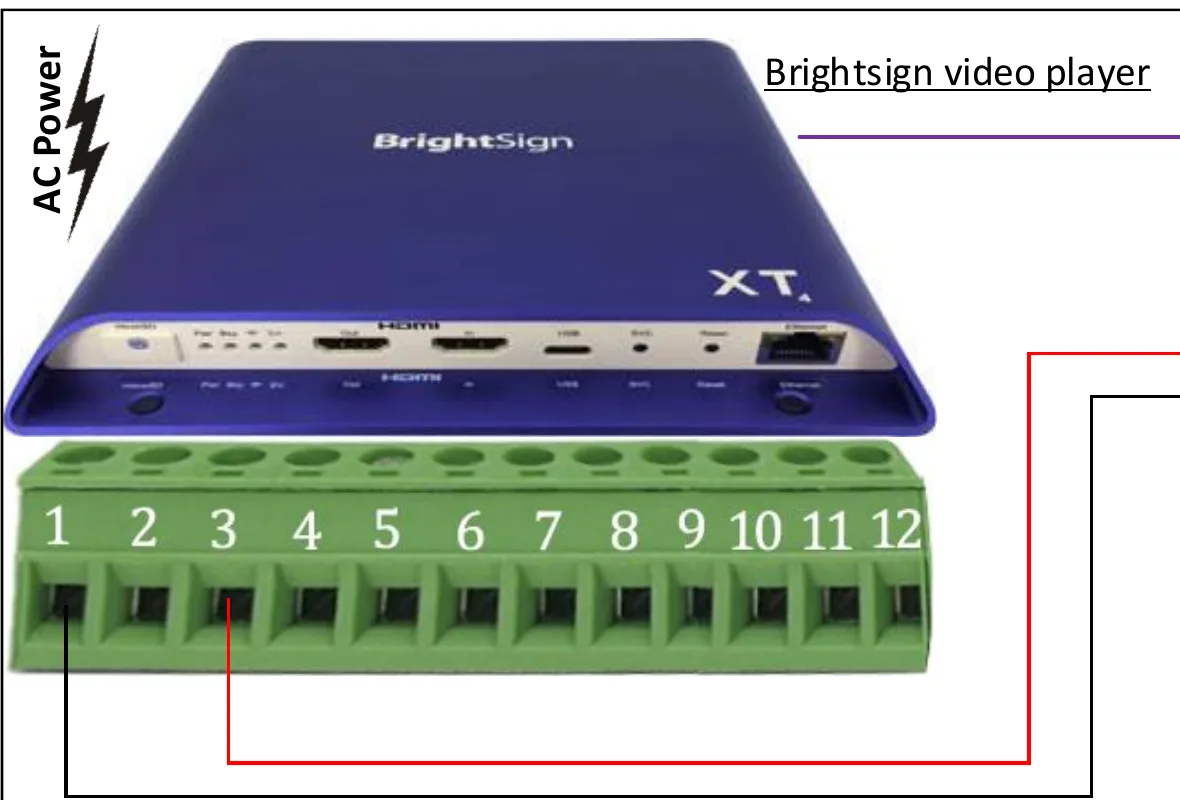
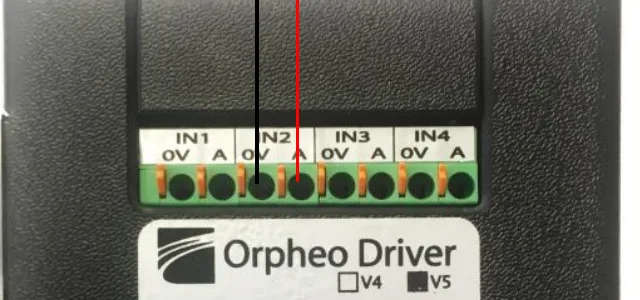
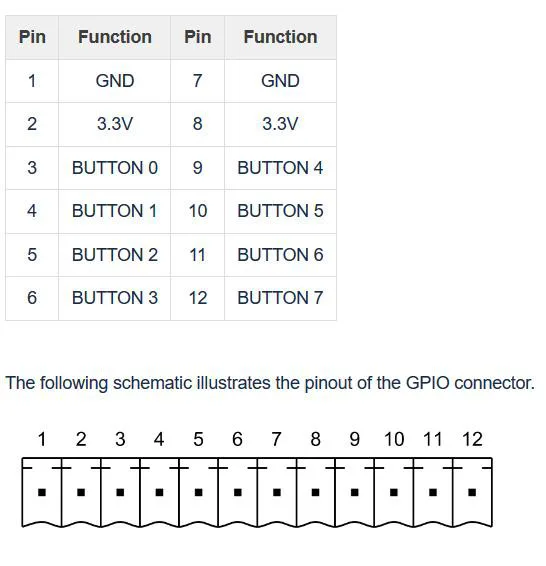
Pin 7 is also GND and can be used instead of pin 1. If you use a GPIO port other than 0, use the corresponding pin (see figure 18) and change the number in the GPIO commands in step 3.
5b · Satellites on the Driver
Each satellite connects to its own SAT output on the underside of the Driver. Each output has three terminals.
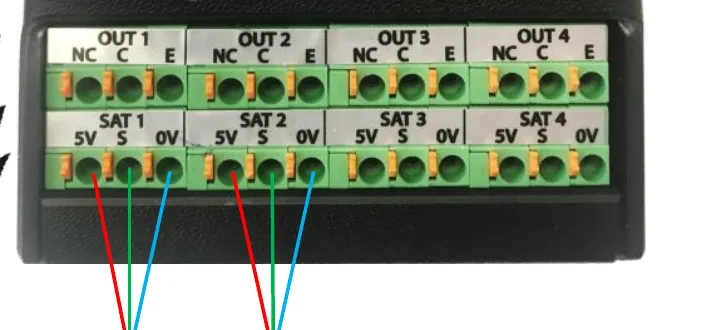
| Terminal | Wire | Function |
|---|---|---|
| 5V | red | satellite power |
| S | green | signal |
| 0V | blue | ground |
Satellite 1 goes on SAT1, satellite 2 on SAT2. Every SAT output you use must be set to Enable in Driver Manager (step 4).
Aim the satellites at the place where visitors watch the video. The audio guide must be able to pick up the infrared signal. Preferably hang them high, with no obstacles in between.
5c · Picture and power
- Connect the BrightSign to the screen with the HDMI cable.
- Connect the power of the screen and the Driver.
- Connect the BrightSign's power last. The BrightSign now starts the presentation.
Testing and fine-tuning
The installation works. Now you make sure picture and sound coincide exactly, with the final equipment in its final place.
6a · Does it work?
- After switching on, wait until the BrightSign has played the short first showing (10 seconds) and the video starts again.
- Stand in the video room with an audio guide and key in 5.
- The audio guide plays the sound from the point where the video is at that moment.
- Stay until the video starts again: the audio guide must start again too.
6b · Adjusting the offset
Every screen, every player and every Driver has a small delay of its own. That is why you adjust the offset on site. The most important moment to watch is a clear sound in the picture: a clap, a door slamming or lips forming a word.
- Watch and listen. If the sound coincides exactly with the picture, you are done.
- If not, adjust the Offset (number of frames) in GuideXpresse Manager under Edit settings › Remote sensing. One frame is 40 milliseconds.
- Put the new settings on the audio guide (settings only, see 2d) and test again.
- Always change one frame at a time and see whether the difference gets smaller or bigger. If it gets bigger, go the other way.
In practice, without correction the sound lags about a quarter of a second (250 ms). −6 frames is 240 ms and is therefore a good starting point. Most installations end up between −4 and −8.
If one language runs slightly differently from the rest, for example because that file starts a fraction later, you can make only that audio file start later with SMPTE offset (ms) on the Automation tab (step 2c). There you enter a positive number of milliseconds.
6c · Final check
- The video repeats and the audio guide repeats along with it (cycle sync).
- Coming in halfway through the video gives the right sound at the right moment.
- The audio guide picks up the signal at every viewing spot in the room.
- All languages run in time with the picture.
- All audio guides have the latest program (via the Master and the charger).
Troubleshooting
Something not working as expected? Look up what you see below.
| What you see | What to check |
|---|---|
| The audio guide does not respond to keying in 5 | Is Infrared Enabled on (step 2b)? Is POI 5 set to Manual synchronisation with IR (step 2c)? Is the new program on this audio guide (step 2d)? Is the satellite facing the right way? |
| The audio guide says it is waiting for synchronisation, but does not start | Does the start signal reach the Driver? Check the two wires (pin 1 › IN2 0V, pin 3 › IN2 A). Is Driver Manager set to BrightSign and On High State? Did you do Send to Driver? |
| An audio guide does not respond to infrared at all | Is the protocol the same in GuideXpresse Manager (Infrared Protocol) and in the Driver (Driver Protocol)? V4 and V5 do not work together. |
| A different sound plays than the one that belongs to the video | Is the Track Code in the Driver the same as the POI number in GuideXpresse Manager? |
| The first round after switching on is not in sync | That is normal: the first showing loads the video. From the second round on it runs in time. If the first showing lasts longer than 10 seconds, check the Timeout on the video with the house (step 3c). |
| The sound is always a fixed amount ahead or behind | Adjust the Offset (number of frames) (step 6b). |
| The sound drifts further off during the film | Was the video made at 25 frames per second? Are GuideXpresse Manager (PAL (25 frames/second)) and the Driver (PAL/SECAM (25fps)) both set to 25 fps? Is the audio file exactly as long as the video? |
| The audio guide does not start again when the video starts again | Is Cycle sync on for POI 5 (step 2c)? Is the GPIO Off 0 command set on the Event Handler in BrightAuthor (step 3d)? Without that step the signal does not go back to low. |
| With several satellites the signal drops out now and then | Is Enable Internal Token Ring on? Is every SAT output you use set to Enable? |
| Driver Manager does not connect | Is the RS232 cable connected properly? Is the Driver on and in configuration mode? With a USB-to-serial adapter, choose the right COM port in the Option menu. |
All settings on one page
Example: video on POI 5, Driver V5, two satellites.
| GuideXpresse Manager · Edit settings › Remote sensing | |
|---|---|
| Infrared Enabled | on |
| Infrared Protocol | Driver V5 (same as the Driver) |
| Frame rate | PAL (25 frames/second) |
| Offset (number of frames) | −6 to start, adjust on site |
| Group | None |
| GuideXpresse Manager · Media › POI 5 › Edit audio file settings › Automation (every language) | |
|---|---|
| No remote control | off |
| Remote control mode | Manual synchronisation |
| Remote sending device | IR |
| Cycle sync | on |
| SMPTE offset (ms) / Extend sync to | empty |
| BrightAuthor | |
|---|---|
| Playlist type | interactive |
| Video (Home) | Entry Command GPIO Off 0 · Timeout 10 s › Event Handler |
| Event Handler / black.png | Entry Command GPIO Off 0 · Timeout 1 s › Video |
| Video (without house) | Video Time Code 0 ms: GPIO On 0 · Media End › Event Handler |
| Presentation Properties › I/O | GPIO 0: Output |
| Publish | Local Storage · Standalone unit · SD card in FAT32 |
| Driver Manager | |
|---|---|
| Driver Protocol | V5 (same as GuideXpresse Manager) |
| Internal Token Ring | Enable Internal Token Ring on |
| Tab | Synchro |
| Track Code | 5 (the POI number) · Jumpers Enable off |
| SAT1 / SAT2 | Enable on · Sending time 7 frames |
| Options › Type / Start | BrightSign / On High State |
| Video Type | PAL/SECAM (25fps) · then Send to Driver |
| Cabling | |
|---|---|
| BrightSign pin 1 (GND) | Driver IN2 · 0V |
| BrightSign pin 3 (GPIO 0) | Driver IN2 · A |
| Satellites | SAT1 and SAT2 · 5V / S / 0V |
| Picture | BrightSign HDMI › screen |
Still stuck?
Get in touch with us. Mention the BrightSign model, the Driver version (V4 or V5) and what you have already checked in the table above. Then we can help you quickly.
- GuideXpresse
- Edisonstraat 3E
2723 RS Zoetermeer - Phone
- +31 (0)79 20 33 007
- Contact form
 References